
Transforming kitchen cabinets can be achieved with expert solutions: a professional paint job, distressed or high-gloss finishes, cabinet refacing, or new veneer doors. Storage upgrades, such as pull-out shelves, introduce function, while decorative crown molding and modern hardware updates add stylish appeal. Open shelving, plate racks, and tailored sideboards offer seamless integration and personalization. These enhancements create a kitchen that feels new and curated. Further ideas continue to refine both form and function for inspired results.
Key Takeaways
- Paint cabinets in a light or high-gloss finish to instantly refresh and brighten your kitchen.
- Reface cabinets by replacing doors and adding new hardware for a modern, cost-effective update.
- Add open shelving or plate racks to blend storage with style and showcase decorative dishware.
- Install pull-out shelves and under-cabinet lighting to enhance organization and functionality.
- Incorporate crown molding and updated handles for a polished, customized look.
Paint Your Kitchen Cabinets

Revitalize a dated kitchen by applying a fresh coat of paint to existing cabinets—a strategic, cost-effective solution that instantly transforms the space.
Updating kitchen cabinets with paint allows homeowners to tailor their kitchen design without the expense of full replacement. For best results, thorough cleaning and sanding prepare surfaces for superior paint adhesion.
Selecting a high-quality paint specifically formulated for cabinetry guarantees a smooth, durable finish resistant to daily wear and tear. Lighter hues can visually expand compact spaces, enhancing both ambiance and function.
A two-tone scheme, featuring contrasting shades on upper and lower cabinets, introduces depth and contemporary flair. For a timeless white kitchen, consider pairing white cabinetry with brass hardware to create a classic and versatile design. As a DIY project, painting your kitchen cabinets empowers homeowners to refresh their environment, elevating aesthetics and value while maintaining budget-conscious sensibility.
Try a Distressed or Antiqued Finish

While a standard paint job can refresh cabinets, employing a distressed or antiqued finish introduces an enhanced layer of character and sophistication to kitchen design. The distressed finish technique involves layering quality paint in complementary tones, then selectively sanding high-touch zones to reveal nuanced color contrasts, imparting rustic character. For an antiqued finish, artisans apply a base coat and a lighter overlay, focusing on crevices to simulate age and depth. Techniques such as gentle denting with a chain further authenticate the effect. Both finishes transform a cabinet makeover into a statement of artistry and heritage, ensuring durability and visual appeal when executed with quality paint. Below is a comparison of these finishes:
| Feature | Distressed Finish |
|---|---|
| Technique | Multi-layer paint + sanding |
| Effect | Rustic, worn |
| Tools | Sandpaper, chain |
| Best for | Farmhouse, vintage |
| Durability | High with quality paint |
Embrace High Gloss for a Modern Touch
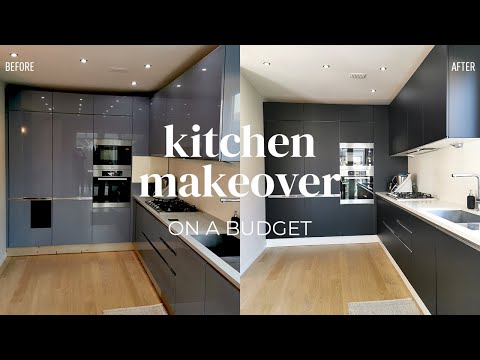
High gloss finishes deliver a contemporary edge to kitchen cabinetry, amplifying both light and spatial perception for a brighter, more expansive environment. For ideal results, experts recommend meticulous surface preparation and the use of premium-grade paints and clear acrylic varnishes to achieve a flawless, durable sheen. This approach not only enhances visual appeal but also streamlines maintenance by offering superior resistance to fingerprints and stains. Incorporating reflective surfaces in your kitchen design can further maximize natural light, creating a sense of cleanliness and openness.
Benefits of High Gloss
One compelling advantage of selecting a high gloss finish for kitchen cabinets lies in its ability to reflect light, instantly brightening the space and creating the illusion of a larger, more open environment.
This modern appearance caters to contemporary tastes, offering a sophisticated, polished aesthetic that improves kitchen design. Additionally, the high gloss finish is easier to clean, as its smooth surface resists fingerprints, smudges, and routine kitchen grime.
The durability of the cabinets is also enhanced, since a high-gloss clear acrylic varnish provides robust protection against scratches and everyday wear.
- Enhances brightness and spatial perception by reflecting light
- Offers a modern appearance with customizable color options
- Increases durability of the cabinets and simplifies maintenance
These attributes make high gloss finishes a strategic choice for kitchen renovations.
Application Tips and Tricks
Achieving a flawless high gloss finish on kitchen cabinets demands meticulous surface preparation and the strategic use of materials.
Professionals emphasize that the foundation of any high gloss application is ensuring clean surfaces—free from grease, dust, and imperfections.
Begin by thoroughly sanding the cabinets, progressively moving to finer grits to create an ultra-smooth base. After removing all residue, apply a high-quality primer to promote paint adhesion.
For the color coat, use a premium paint formulated for cabinetry, allowing it to dry fully before proceeding.
Application tips include using a high-density foam roller or spray system for uniform coverage and reduced brush marks.
Seal the finish with a high-gloss clear acrylic varnish for durability, transforming kitchen cabinets with a reflective, modern aesthetic that is easy to maintain.
Reface Cabinets With New Doors and Veneers

Transforming the kitchen’s aesthetic, cabinet refacing replaces outdated doors and applies new veneers to existing cabinet frames, delivering a cost-effective alternative to full cabinet replacement. By refacing cabinets, homeowners achieve a dramatic visual transformation while saving 30-50% compared to installing entirely new units. The process entails the removal of old doors, meticulous cleaning and sanding of surfaces, and the installation of new doors and matching veneers that reflect the desired design vision. Integrating new hardware further refines the look, offering opportunities for customization and a contemporary finish. For intricate projects or specialty materials, professional installation guarantees seamless alignment and durability. Consider incorporating multi-functional islands to maximize storage and workspace, creating a central gathering point for family and friends. Replace old cabinet doors with modern styles for instant appeal. Apply high-quality veneers for a cohesive, updated appearance. Select new hardware to personalize and modernize cabinetry.
Install Pull-Out Shelves for Better Storage

Maximize kitchen storage efficiency with the strategic installation of pull-out shelves, a solution designed to eliminate the wasted space and accessibility issues common in standard cabinetry. By integrating pull-out shelves, homeowners can access previously underutilized storage potential, transforming deep cabinets into accessible and highly functional zones. This upgrade allows for seamless organization and effortless retrieval of pots, pans, and pantry staples, enhancing overall kitchen functionality. Additionally, pull-out shelves support enhanced workflow by establishing separate zones for storing and retrieving kitchen items, reducing unnecessary movement and promoting a streamlined cooking process.
| Benefit | Description |
|---|---|
| Accessibility | Easy reach of items at the back of cabinets |
| Versatility | Adaptable to most cabinet sizes and configurations |
| DIY-Friendly | Straightforward installation with basic tools |
| Durability | Smooth-gliding, long-lasting mechanisms |
Pull-out shelves represent a practical and stylish storage upgrade, optimizing space while elevating the kitchen’s efficiency and design.
Add Undercabinet Lighting for Ambiance and Function

While optimizing cabinet interiors with pull-out shelves addresses storage challenges, enhancing the kitchen’s lighting can further improve both functionality and atmosphere. Undercabinet lighting delivers targeted task lighting that increases visibility for food preparation and augments safety by illuminating countertops directly. Options such as energy-efficient LED strips, sleek puck lights, or traditional fluorescent fixtures cater to a range of style preferences and brightness needs. The installation process is accessible as a DIY project, requiring only basic tools and minimal electrical expertise. Incorporating dimmer switches provides adjustable brightness, enabling users to tailor the ambiance for various kitchen activities. Accurate measurement of cabinet length guarantees even distribution of light and seamless integration with existing cabinetry. For outdoor spaces, features like integrated lighting solutions enhance both aesthetics and functionality, ensuring that evening gatherings are well-lit and inviting. LED strip lighting for continuous illumination, puck lights for focal task lighting, and dimmer switches for customizable ambiance.
Build a Butcher Block Island for Warmth and Utility

Selecting the appropriate butcher block material, such as maple or walnut, is essential for achieving both resilience and visual harmony within the kitchen. Homeowners may consider fabricating a custom island or opting for a pre-assembled version, balancing craftsmanship preferences with budgetary constraints. Proper maintenance—regular oiling and prompt cleaning—ensures the surface remains both hygienic and visually appealing over time. Introducing a butcher block kitchen island can serve as a focal point that blends functionality with aesthetic appeal, enhancing the overall design of the space.
Choosing Butcher Block Materials
Because butcher block islands serve as both a visual centerpiece and a functional workspace, the selection of materials is critical to achieving peak durability and aesthetic harmony.
Expertly crafted kitchen islands utilize hardwoods such as maple, walnut, or cherry, which are prized for their resilience and ability to resist warping. Ideal butcher block thickness ranges from 1.5 to 2.5 inches, delivering structural integrity for both food preparation and casual dining.
Material choice directly influences the rustic charm and tactile warmth that define these islands. Regular maintenance, including oiling to prevent drying and cracking, is essential for preserving the butcher block’s longevity and finish.
- Choose hardwoods (maple, walnut, cherry) for maximum durability
- Select appropriate thickness (1.5–2.5 inches) for structural strength
- Prioritize regular maintenance to guarantee lasting beauty
DIY Versus Pre-Made
Once the right butcher block materials have been identified, homeowners are faced with the choice between constructing a custom island or opting for a pre-made solution.
A DIY kitchen approach enables precise customization, allowing the butcher block island to align seamlessly with the dimensions and style of new cabinets or existing layouts. This method is cost-effective, ideal for those seeking to update your kitchen cabinets or paint in different finishes for a cohesive aesthetic.
Conversely, pre-made butcher block islands offer convenience and rapid installation, making them attractive for swift kitchen makeovers. Both options deliver durability and warmth, with hardwood surfaces that withstand daily use.
Ultimately, the decision hinges on the homeowner’s priorities—bespoke design flexibility versus streamlined, ready-to-install solutions that enhance both workspace and social function.
Maintenance and Care Tips
While a butcher block island enhances both the warmth and functionality of a kitchen, its longevity depends on proper care tailored to the unique properties of hardwood surfaces.
Effective maintenance not only preserves the aesthetic but also optimizes the butcher block’s durable utility. Regularly applying mineral oil hydrates the wood, preventing cracks and maintaining a clean, resilient surface.
For maximum hygiene, cleaning should utilize mild soap and warm water, strictly avoiding abrasive or harsh chemicals that compromise the finish. Applying a food-safe finish or sealant further fortifies the wood against moisture and everyday wear, a critical step in high-use kitchens.
- Apply mineral oil every few months to maintain hydration and prevent cracking.
- Clean with mild soap and warm water; avoid harsh chemicals.
- Use a food-safe finish for enhanced durability and moisture resistance.
Create a Sideboard Using Stock Cabinets

A well-executed sideboard constructed from stock kitchen cabinets offers a tailored storage solution that integrates seamlessly with existing kitchen design. Homeowners seeking to create a sideboard can capitalize on the versatility of stock cabinets, configuring them to fit precise spatial and organizational needs. This approach delivers a custom storage solution at a fraction of the cost of bespoke furniture and transforms a simple DIY endeavor into a sophisticated design upgrade. Stock cabinets can be finished with paint or stain that matches the kitchen palette, ensuring a cohesive look. For added refinement, incorporating decorative elements such as furniture feet can enhance the visual impact. Completing this project within a day makes it accessible while delivering significant aesthetic and functional value to the kitchen environment. Additionally, integrating wood accents into the sideboard introduces warmth and organic cohesion, enhancing the overall design with textural contrast.
Incorporate Decorative Crown Molding

Many homeowners seeking a refined, custom look for their kitchen cabinets turn to decorative crown molding as a strategic design upgrade.
Crown molding enhances the aesthetic by introducing architectural detail and visual interest, seamlessly bridging the gap between cabinetry and ceiling. The installation process requires precise measuring, cutting, and secure attachment, often executed on a workbench for maximum accuracy.
By selecting crown molding that complements existing décor, one guarantees a cohesive and sophisticated result. This element not only creates an illusion of taller cabinets but also signifies craftsmanship, enhancing the perceived value of a kitchen renovation.
For those considering this enhancement, key considerations include:
- Selecting a crown molding style proportional to cabinet and ceiling height
- Confirming meticulous installation for flawless alignment
- Coordinating molding finish with overall kitchen palette
Incorporating natural materials like wood or stone into the kitchen design can further enhance the overall aesthetic, adding warmth and texture that complements the crown molding.
Update Cabinet Hardware for Instant Style

Among the most impactful yet accessible kitchen cabinet upgrades, replacing outdated hardware delivers instant visual transformation with minimal investment of time or resources. To update cabinet hardware, homeowners can select from a wide array of new knobs and pulls in materials such as brushed chrome, copper, or matte black, each offering distinctive style statements. The introduction of these elements can dramatically shift the visual appeal of cabinetry, making them appear more modern, refined, or cohesive with the overall kitchen design. Prioritizing both functionality and design is critical—larger handles can enhance usability while simultaneously improving aesthetics. For a harmonious look, it is advisable to coordinate cabinet hardware finishes with existing fixtures like faucets or lighting, ensuring a unified visual flow that raises the kitchen’s overall ambiance. Black hardware offers timeless versatility for kitchen designs, maintaining both classic and modern appeal.
Mix in Open Shelving or Plate Racks

Integrating open shelving or plate racks offers an opportunity to showcase everyday dishware while seamlessly merging storage with visual appeal. By selecting finishes and materials that echo existing cabinetry, homeowners can guarantee a cohesive and curated presentation. This approach transforms functional storage into a design feature, balancing practicality with style. Glass storage units provide a sleek, minimalist design with transparency that can further enhance the luxury appeal of a kitchen.
Showcase Everyday Dishware
A strategic blend of open shelving and plate racks enables the kitchen to function as both a practical workspace and a curated display area.
By incorporating open shelving into kitchen design, homeowners can showcase everyday dishware, turning functional items into visually appealing focal points. This approach enhances spaciousness by removing bulky cabinet doors, allowing light to permeate and visually expanding the space.
Open shelves provide immediate access to frequently used pieces while enabling personalized curation of colors, shapes, and textures. Plate racks further complement this by organizing dishes in a manner that is both efficient and decorative.
Brackets and decorative supports can be selected to align with overall kitchen design, reinforcing stylistic cohesion.
- Display colorful, uniquely designed dishware as a focal point
- Use decorative brackets for visual continuity
- Alternate open shelves with closed cabinetry for balance
Combine Storage and Style
Enhance kitchen functionality by thoughtfully blending open shelving and plate racks with traditional cabinetry, achieving a harmonious balance of storage efficiency and visual appeal. Open shelving introduces a visually appealing element that can enhance style while providing immediate access to frequently used items. By displaying decorative dishware or curated cookbooks, homeowners infuse personality and create a cohesive look. Integrating adjustable shelves or plate racks offers a versatile solution adaptable to evolving storage requirements. Additionally, open shelving reduces visual bulk, helping the kitchen feel more expansive. For a seamless design, it is crucial to coordinate materials and finishes between open elements and cabinets. This approach guarantees that storage innovations not only maximize practicality but also uplift overall kitchen aesthetics.
| Benefit | Implementation Tip |
|---|---|
| Visually Appealing | Mix finishes thoughtfully |
| Enhance Style | Display colorful dishware |
| Versatile Solution | Use adjustable shelving |
Swap Out or Paint Cabinet Door Fronts

For homeowners seeking a transformative yet economical kitchen update, replacing or painting cabinet door fronts provides a high-impact solution that circumvents the cost and complexity of full cabinet replacement.
Swapping out cabinet door fronts instantly delivers a new look, allowing for customization in both material and profile. Alternatively, applying fresh paint to cabinet door fronts offers endless aesthetic possibilities—ranging from high-gloss lacquer for modern appeal to a distressed finish for rustic warmth.
Meticulous surface preparation, including cleaning and sanding, is essential to achieve durable, professional results. For added design interest, a two-tone paint scheme can introduce depth and contrast.
Updating hardware post-renovation completes the cohesive transformation.
- Swap out cabinet door fronts for a cost-effective upgrade
- Apply fresh paint in custom finishes for a personalized new look
- Install modern hardware to enhance the refreshed aesthetic
Frequently Asked Questions
How to Make Old Kitchen Cabinets Look New?
To make old kitchen cabinets look new, experts recommend cabinet painting techniques aligned with current color trends, strategic hardware upgrades, exploring open shelving ideas, and considering refacing options for a high-impact, style-forward, and solution-oriented aesthetic transformation.
How Can I Update My Cabinets Without Replacing Them?
Cabinets can be updated without replacement through advanced cabinet painting techniques, stylish hardware replacement options, and a refacing materials guide. Integrating kitchen organization tips and DIY cabinet projects further enhances visual appeal and functionality, offering cost-effective, transformative solutions.
How to Update Kitchen Cabinets Without Replacing Them in the UK?
To update kitchen cabinets without replacing them in the UK, homeowners can explore advanced cabinet painting techniques, contemporary hardware replacement options, DIY refinishing tips, modern color trends, and innovative cabinet organization solutions for a stylish, cost-effective transformation.
What Is the Least Expensive Way to Redo Kitchen Cabinets?
The least expensive way to redo kitchen cabinets involves budget friendly options like DIY painting techniques for a fresh finish, cabinet refacing ideas, hardware upgrades, and incorporating creative storage solutions to revitalize aesthetics and functionality without major expenditure.
Conclusion
A kitchen cabinet makeover offers a strategic opportunity to transform the heart of the home with tailored solutions. From high-gloss finishes and antiqued patinas to functional upgrades like pull-out shelves and new hardware, each idea balances aesthetic refinement with practical value. Whether opting for open shelving or decorative molding, these expert strategies make certain cabinetry feels both enhanced and current. Thoughtful consideration of finish, form, and function assures a refreshed kitchen that aligns seamlessly with modern style sensibilities.